If you’ve been using GitHub Copilot in VS Code, you’re probably familiar with the built-in agents like @workspace, @terminal, and @vscode. These are great for general tasks, but there’s a relatively new capability that unlocks even more power - custom agents. Since custom agents became available, I’ve been experimenting with them extensively, and I’ve found that they can transform repetitive multi-step tasks into single commands and enforce team standards automatically without anyone having to remember them.
In this post, I’ll walk you through creating custom agents from the basics to advanced multi-agent workflows. We’ll build practical examples that you can adapt for your own projects, starting with a simple JSON to YAML converter and progressing to an API documentation generator that creates files directly in your workspace. Then we’ll connect these agents through handoffs to create an automated workflow. By the end, you’ll have everything you need to build a suite of specialized agents that work together seamlessly.
What you’ll need: VS Code with GitHub Copilot enabled. Some familiarity with .vscode configuration files helps but isn’t strictly required - I’ll explain the key concepts as we go.
This guide focuses specifically on custom agents in VS Code. While custom agents also work with GitHub Copilot coding agent (on GitHub.com), some features and behaviours may differ between environments. The examples and workflows shown here are tested in VS Code.
Understanding Custom Agents
Custom agents are essentially AI assistants that you define using a simple configuration format. Think of them as specialized colleagues who already know your team’s conventions, your database schema patterns, or your documentation standards. Instead of explaining the same complex transformation to Copilot every single time, you create an agent that already knows exactly how to do it.
The configuration files live in .github/agents/ within your project. Each agent is defined in an .agent.md file with a straightforward structure that we’ll explore in a moment.
How Agent Files Are Structured
Let’s look at what goes into an agent definition. Create a file like your-agent.agent.md in .github/agents/:
---
description: Brief overview shown as chat input placeholder
name: Agent Display Name
handoffs:
  - label: Hand off to another agent
    agent: another-custom-agent
    prompt: Process this request with specific context
---

[Define what your agent does and how it behaves]

[Include examples, transformation rules, and detailed instructions]
There are two main parts to this:
1. Front Matter (YAML section at the top - Optional): This is where you define your agent’s metadata. Key fields include:
description: A brief overview that appears as the chat input placeholder textname: Your agent’s display name (defaults to the filename if omitted)handoffs: Structured configurations for delegating to other agents (optional)- Other optional fields:
tools,model,argument-hint,infer,target,mcp-servers
2. Body Content (Markdown instructions): This is the heart of your agent. Here you define exactly what your agent does using markdown-formatted instructions and guidelines. Include what kind of input it accepts, how it transforms that input, what output it produces, and examples showing the agent how to handle different scenarios. The more specific and detailed you are here, the better your agent will perform.
About Handoffs:
Handoffs enable you to create guided sequential workflows that transition between agents. Instead of informal instructions, handoffs use a structured YAML format in the frontmatter with fields like label (button text), agent (target agent), prompt (message to send), and send (auto-submit toggle). This allows multiple specialized agents to collaborate on complex tasks.
The documentation and examples primarily show handoffs between custom agents (like mermaid-to-table, api-doc-generator). While it’s unclear for me from the documentation whether handoffs can target built-in agents like @workspace or @terminal, in practice, workflows typically chain together custom agents where you have full control over the behaviour and context passing. You can still invoke built-in agents manually as needed in chat by using @workspace or @terminal.
Building Your First Agent - JSON to YAML Converter
Let’s build a practical agent together. We’ll create a JSON to YAML converter - it’s simple enough to understand quickly but demonstrates all the core concepts you need to know. I chose this example because it’s something many developers need regularly, and it shows how to handle different input formats, define transformation rules, and produce clean output.
Setting Up the Agent
Create a new file at .github/agents/json-to-yaml.agent.md and let’s build it step by step:
---
description: Converts JSON to YAML format with proper formatting
name: JSON to YAML Converter
---

Convert JSON input into well-formatted YAML output.

## Input Format

Accept JSON in any form:
- Raw JSON text
- JSON code blocks
- File paths to .json files

## Transformation Rules

1. **Preserve structure**: Maintain exact hierarchical structure
2. **Format conventions**:
   - 2-space indentation
   - Quote strings only when necessary
   - Use `- ` for array items
   - Preserve key ordering

3. **Handle special cases**:
   - Empty objects: `{}`
   - Empty arrays: `[]`
   - Null values: `null`
   - Booleans: `true`/`false` (no quotes)
   - Numbers: No quotes

## Error Handling

If the input is not valid JSON:
1. Identify the syntax error (missing quotes, trailing commas, etc.)
2. Explain what's wrong clearly
3. Show the problematic section
4. Suggest the correction
5. Do not attempt conversion until valid JSON is provided

## Output Format

Return clean YAML in a code block:

```yaml
[converted content]
```

## Examples

### Example 1: Valid JSON

**Input:**
```json
{
  "name": "John Doe",
  "age": 30,
  "active": true,
  "roles": ["admin", "user"]
}
```

**Output:**
```yaml
name: John Doe
age: 30
active: true
roles:
  - admin
  - user
```

### Example 2: Invalid JSON (Error Handling)

**Input:**
```json
{
  "name": "John Doe",
  "age": 30,
  "active": true,
  "roles": ["admin", "user"],
}
```

**Output:**
```
Error: Invalid JSON - trailing comma detected.

The issue is on line 5:
  "roles": ["admin", "user"],
                            ^ Remove this comma

Corrected JSON should be:
{
  "name": "John Doe",
  "age": 30,
  "active": true,
  "roles": ["admin", "user"]
}
```
Notice how we’re being very explicit about what the agent should do. The transformation rules cover all the edge cases we can think of, and the examples show the agent both how to handle valid input and how to provide helpful error messages for invalid input.
Using Your New Agent
Once you save this file, reload your VS Code window (you can use the Command Palette: Developer: Reload Window). Your custom agent will now appear in the Copilot Chat agent picker.
How to invoke custom agents:
Custom agents work differently from built-in agents. Instead of typing @agent-name, you select them from a dropdown:
- Open GitHub Copilot Chat (sidebar or inline)
- Click the agent picker dropdown (the button that shows which agent is active - usually shows
@workspaceby default) - Select “JSON to YAML Converter” from the list
- Type your message:
convert this: {"key": "value", "number": 42}
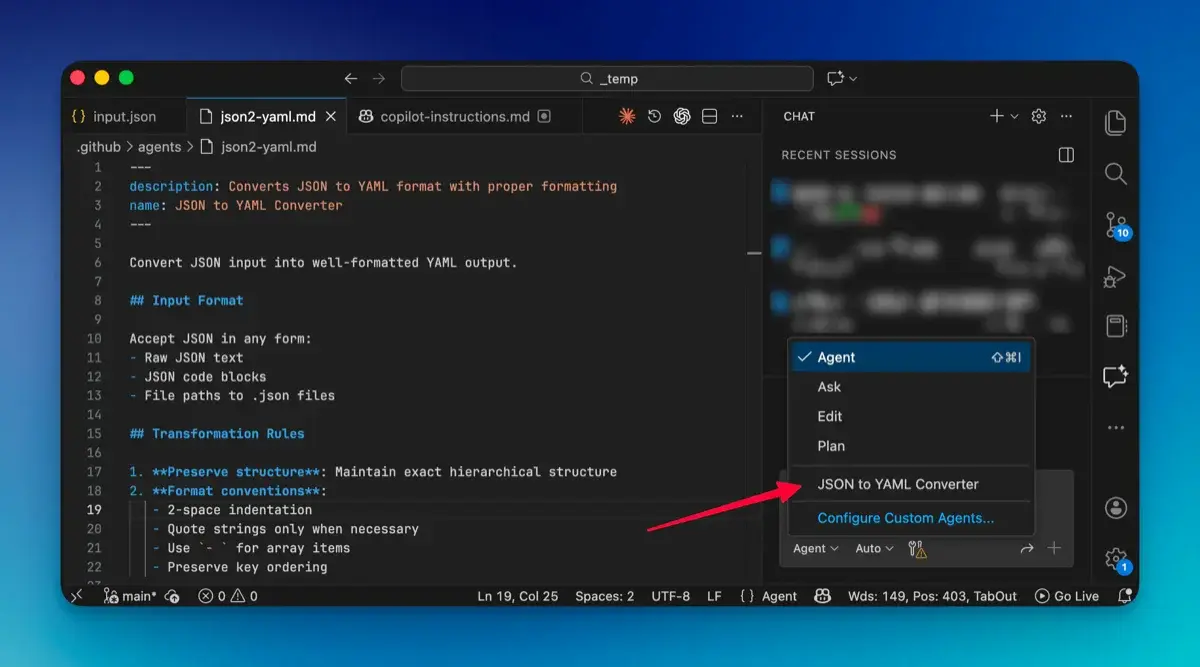
Important distinction: The @ symbol only works for GitHub Copilot’s built-in agents like @workspace, @terminal, and @vscode. Custom agents appear in the same dropdown menu but are selected with the mouse/keyboard, not by typing @.
The agent will handle the conversion following all the rules you defined. No more explaining how YAML formatting works or which values need quotes - the agent already knows all of this.
Taking It Further - File Creation and Workspace Integration
Now that you’ve got a basic agent working, let’s explore something more powerful. Agents can create files directly in your workspace, which opens up a whole new world of possibilities. Instead of just showing you output in the chat that you then copy and paste, agents can generate complete, ready-to-use files that are saved exactly where they need to be in your project structure.
I’ll show you how to build an agent that generates API documentation from OpenAPI specifications. This is something I found myself doing repeatedly - taking an OpenAPI spec and manually creating markdown documentation from it. It was tedious and error-prone, and every time the API changed, I had to update the docs manually. An agent solves this completely.
Building an API Documentation Generator
Let’s create this agent step by step. The agent will read OpenAPI/Swagger specifications and generate comprehensive markdown documentation, complete with all the endpoints, parameters, request/response examples, and authentication details.
Create .github/agents/api-doc-gen.agent.md:
---
description: Generates API documentation from OpenAPI/Swagger specs
name: API Doc Generator
---

Convert OpenAPI/Swagger specifications into comprehensive markdown documentation.

## Input Sources

- Inline YAML/JSON specifications
- File paths to spec files
- URLs to hosted specifications

## File Output Strategy

**When to create files:**
- User requests: "save to file", "create docs", "generate documentation"
- User specifies output path

**Naming convention:**
- Default: `api-documentation.md`
- From spec title: `[api-name]-docs.md`
- Custom: Use user-specified filename

## Documentation Template

```markdown
# [API Name] Documentation

**Version:** [version]
**Base URL:** [baseUrl]

## Authentication

[Authentication details]

## Endpoints

### [Tag Name]

#### [Method] [Path]

**Description:** [description]

**Parameters:**

| Name | In  | Type | Required | Description |
| ---- | --- | ---- | -------- | ----------- |
| ...  | ... | ...  | ...      | ...         |

**Request Example:**
```json
[example request]
```

**Response Example:**
```json
[example response]
```
The beauty of this approach is that the agent understands the structure of OpenAPI specs and knows how to extract all the relevant information. It handles the formatting, creates proper Markdown tables, and organizes everything in a logical flow.
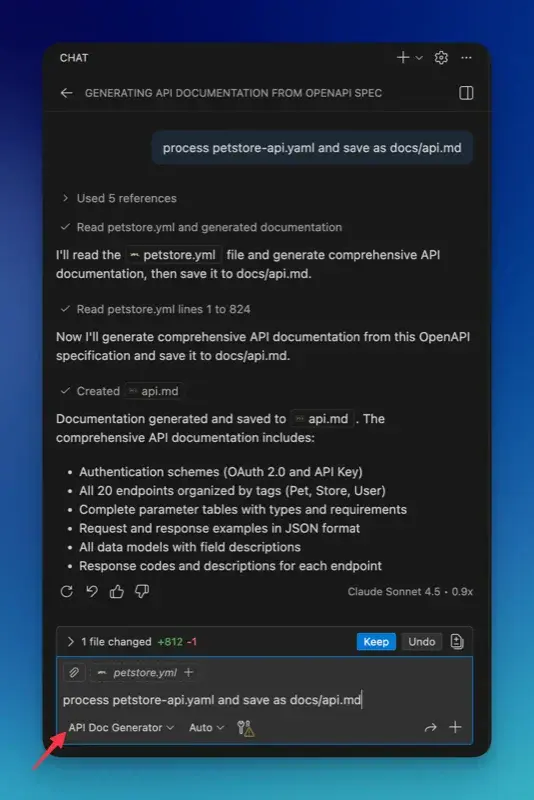
Using the API Doc Generator
Once you’ve created this agent, reload VS Code and select “API Doc Generator” from the agent picker dropdown. Then you can send it a message like:
process petstore-api.yaml and save as docs/api.mdThe agent will read the spec, generate the full documentation following the template you defined, and save it to docs/api.md in your workspace. If your API spec changes, you just select the agent again and send the same message - the documentation is updated instantly. No more manual updating, no more forgetting to document a new endpoint.
Multi-Agent Workflows - Making Agents Work Together
Here’s where custom agents get really interesting. Once you have several specialized agents, you can make them collaborate through handoffs to handle complex workflows that would normally require multiple manual steps. Let’s see how we can connect the JSON to YAML and API Doc Generator agents we’ve already built into a practical workflow.
The key insight here is that instead of trying to build one massive agent that does everything, you build focused agents that each do one thing well, and then you orchestrate them. It’s the same principle as microservices - smaller, focused units that work together are more maintainable and flexible than monoliths.
Building an API Spec Workflow
Let’s enhance our existing agents to work together. Imagine you receive an OpenAPI spec in JSON format (common when specs are generated programmatically), but you want YAML for better readability, plus you need the documentation generated. Here’s how we can chain our agents together.
Agent 1: Enhanced JSON to YAML Converter (with handoffs)
Let’s update our JSON to YAML agent to include a handoff to the API Doc Generator when it detects an OpenAPI spec:
.github/agents/json-to-yaml.agent.md:
---
description: Converts JSON to YAML format with proper formatting
name: JSON to YAML Converter
handoffs:
  - label: Generate API docs
    agent: API Doc Generator
    prompt: Generate API documentation from this OpenAPI specification
---

Convert JSON input into well-formatted YAML output.

## Input Format

Accept JSON in any form:
- Raw JSON text
- JSON code blocks
- File paths to .json files

## Transformation Rules

1. **Preserve structure**: Maintain exact hierarchical structure
2. **Format conventions**:
   - 2-space indentation
   - Quote strings only when necessary
   - Use `- ` for array items
   - Preserve key ordering

3. **Handle special cases**:
   - Empty objects: `{}`
   - Empty arrays: `[]`
   - Null values: `null`
   - Booleans: `true`/`false` (no quotes)
   - Numbers: No quotes

## Output Format

Return clean YAML in a code block:

```yaml
[converted content]
```

## Handoff Logic

After converting JSON to YAML:
- If input contains OpenAPI markers (`openapi:`, `swagger:`, `info:`, `paths:`)
- Suggest handoff to api-doc-gen agent with button: "Generate API docs"

## Example

**Input:**
```json
{
  "openapi": "3.0.0",
  "info": {
    "title": "My API",
    "version": "1.0.0"
  },
  "paths": {
    "/users": {
      "get": {
        "summary": "Get all users"
      }
    }
  }
}
```

**Output:**
```yaml
openapi: 3.0.0
info:
  title: My API
  version: 1.0.0
paths:
  /users:
    get:
      summary: Get all users
```
Agent 2: API Doc Generator (Already Created)
Our API Doc Generator agent stays as-is, ready to receive the converted YAML from the JSON to YAML agent. No changes needed!
Seeing the Workflow in Action
Now let’s see how these agents work together when you actually use them:
User selects “JSON to YAML Converter” agent and pastes an OpenAPI spec in JSON: “Convert this API spec to YAML”
-
JSON to YAML Converter:
- Receives the JSON OpenAPI specification
- Converts to clean, formatted YAML
- Detects OpenAPI markers in the content
- Displays converted YAML to user
- Shows handoff button: “Generate API docs”
-
User clicks “Generate API docs” button:
- Hands off to API Doc Generator agent with the YAML spec
- Context automatically includes the converted YAML
-
API Doc Generator:
- Receives the OpenAPI YAML from previous agent
- Parses the specification structure
- Generates comprehensive markdown documentation
- Saves file: api-documentation.md
- Returns formatted documentation to user
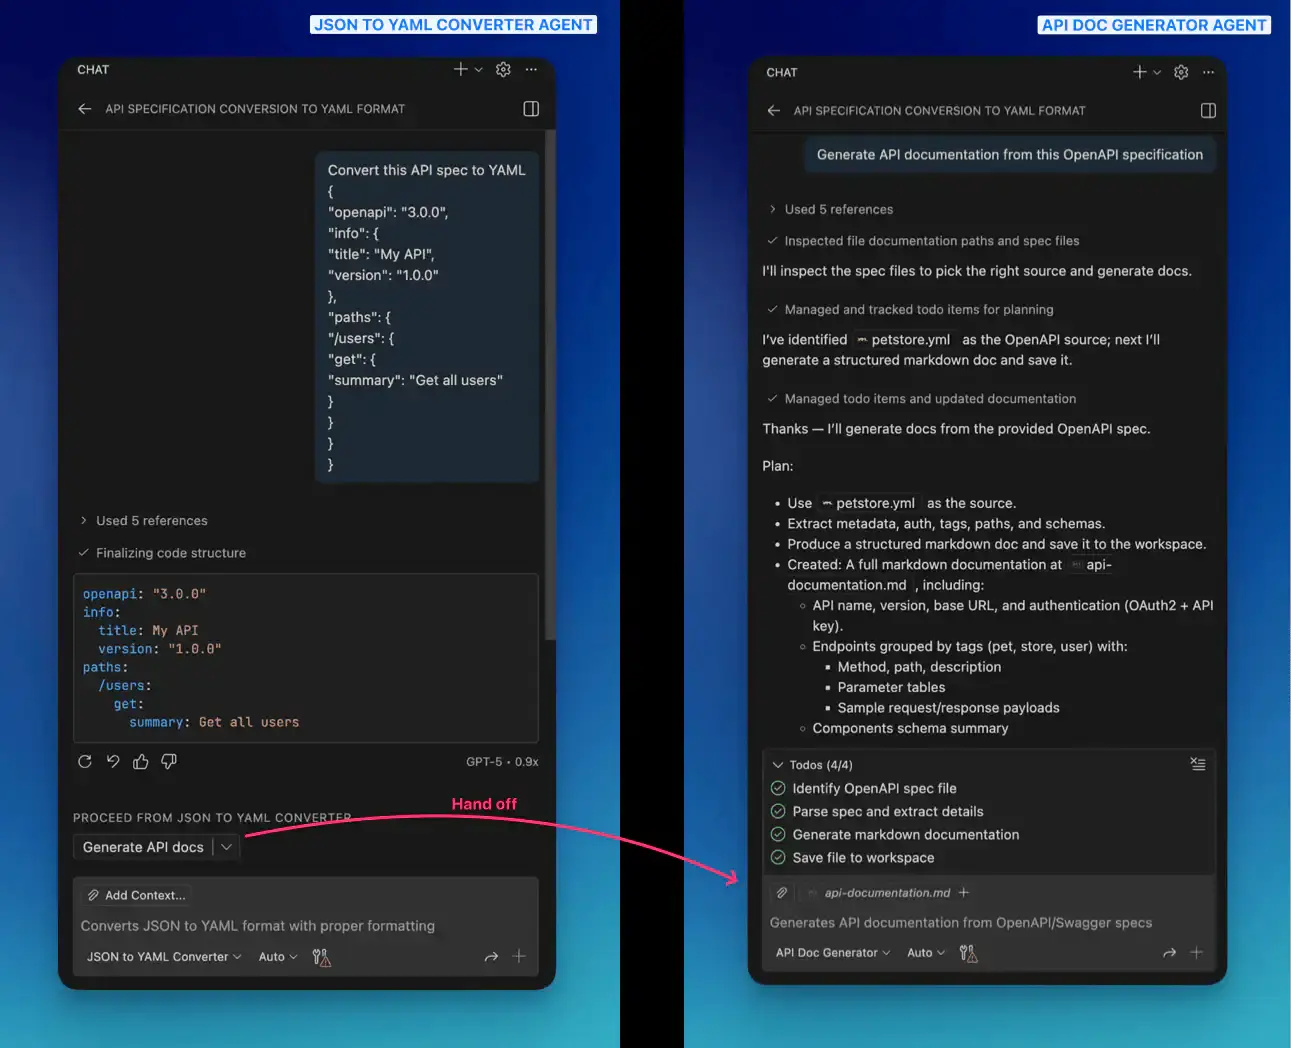
What would have been a manual process - converting formats, then copying to another tool to generate docs - is now streamlined into a guided workflow. The user gets both the cleaned-up YAML spec and complete documentation with just a couple of clicks.
Real-World Scenarios
Now that you understand the basics, here are some ideas for custom agents you might build for your own workflows:
API-First Development Pipeline: Create an orchestrator agent that takes an OpenAPI spec and coordinates multiple agents to generate documentation, TypeScript types, route stubs, and test scaffolding. This ensures your entire API implementation starts from a validated spec and stays consistent across layers.
Database Migration Helper: Build an agent that analyses schema changes and generates safe migration scripts with automatic rollback generation. It can detect breaking changes (like dropping columns with data or incompatible type changes), warn about potential data loss, and suggest multi-step migration paths for complex schema evolutions.
Documentation Sync Guardian: An agent that monitors git diffs for code changes and automatically updates corresponding documentation. When it detects new API endpoints, modified type signatures, or changed configuration options, it hands off to your doc generator agents and creates changelog entries. This keeps documentation in sync with code without manual intervention.
The key is to identify repetitive tasks in your workflow that require multiple steps or have specific rules that need to be remembered. Those are perfect candidates for custom agents.
Best Practices
Building effective custom agents requires both following documented guidelines and learning from practical experience. Here’s what works well, distinguishing between official recommendations and patterns I’ve discovered through use.
Be Specific in Your Instructions
Early on, I created an agent with instructions like “Convert data to the right format” - and it performed terribly because “the right format” means different things in different contexts. When I rewrote it to be explicit about every transformation rule, the agent became reliable.
Here’s the difference. Instead of:
Convert data to the right formatBe explicit about every detail:
### Transformation Rules

1. **Dates:** Convert Unix timestamps to ISO 8601 format
   - Input: 1704844800
   - Output: "2024-01-10T00:00:00.000Z"

2. **Currency:** Convert cents (integer) to decimal with 2 places
   - Input: 1299
   - Output: "12.99"
The more specific you are about inputs, outputs, and edge cases, the better your agent will perform.
Include Comprehensive Examples
I’ve found that examples teach your agent what good output looks like. I always include at least 3-4 examples covering different scenarios - a simple case, a complex case with nested data, edge cases like empty arrays, and cases with special characters. Each example shows the agent the exact input it might receive and the exact output you expect.
This has made a huge difference in consistency. Without examples, I found that agents would sometimes produce output in slightly different formats depending on the input. With good examples, they produce consistent output every time.
Make Output Copy-Paste Ready
This seems obvious, but it’s easy to overlook: users should be able to copy your agent’s output directly into their project without modification. That means:
- Using proper code blocks with language tags
- Not adding explanatory text inside code blocks
- Providing complete, runnable code
- Including all necessary imports
- No placeholders like
[YOUR_CODE_HERE]
I’ve seen agents that produce output requiring manual clean-up before use. It defeats the purpose - the whole point is automation.
Wrapping Up
Custom agents have transformed how I work in VS Code. What started as a simple experiment with a JSON converter has evolved into a suite of specialized agents that handle everything from database documentation to API workflow orchestration. The key is to start simple - pick one repetitive task that you do frequently, create an agent for it, and then expand from there.
In my experience, the sweet spot is having 5-10 focused agents that each do one thing really well, rather than trying to create one massive agent that does everything. When agents are focused, they’re easier to maintain, easier to understand, and they work better together through handoffs.
That’s it for this post. Thank you for reading!